この投稿では、Arduino、16 x 2ディスプレイ、およびリアルタイムクロックモジュールを使用して、自動スクールベル/カレッジベルシステムを構築します。このプロジェクトをプログラムして、希望する時間と分に1日16回までベルを鳴らすことができます。ベルリングの長さは秒単位でプログラムできます。
コーディングなしのよりシンプルなバージョンをお探しですか?それを得る ここに
概要概要
学校のペオンが「タンタンの冒険」というベルを鳴らし、生徒たちが飛んでいる色で学校の入り口を使い果たした時代は終わりました。数分前にペオンが最後のベルを鳴らしたとき、さらに幸せになる人もいます。
これは15〜20年前のシナリオでしたが、現在ではすべての学校と大学が厳密に期限を定めており、ベルは自動化されています。
“変圧器の用途は何ですか ”
著者の幼年期/ 10代のフードは次のことを覚えています。
私が身につけていたデジタル時計は、小中学校で1秒の精度で学校のベルシステムと同期していました。
ベルが鳴った後、「ベルが5秒で鳴ります」と叫びます。生徒全員が驚いて私を見つめます。これはほぼ毎日起こります。ある日、私と私の親しい友人は、最後の鐘の前に10、9、8、7…..カウントダウンを開始します。
友達はみんな魔法の腕時計だと言っていますが、学校の鐘が自動化されているという単純な事実に気づいていませんでした。笑!!
Arduinoを使用してそのような学校/大学の鐘を1つ作成します。
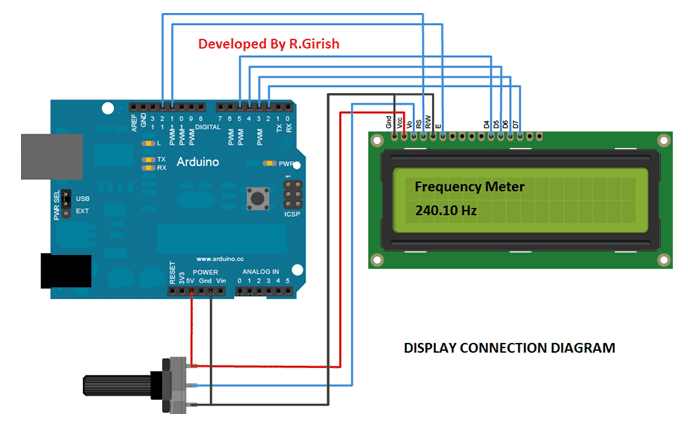
Arduino接続への表示
Arduino接続へのディスプレイは、通常の配線とは少し異なります。ここで使用されているピン9、8、7、6、5、および4です。ピン番号2と3は、ハードウェア割り込みとして使用されます。 ボタンを押す 。
10Kを使用する ポテンショメータ のコントラストを調整するため 表示 。


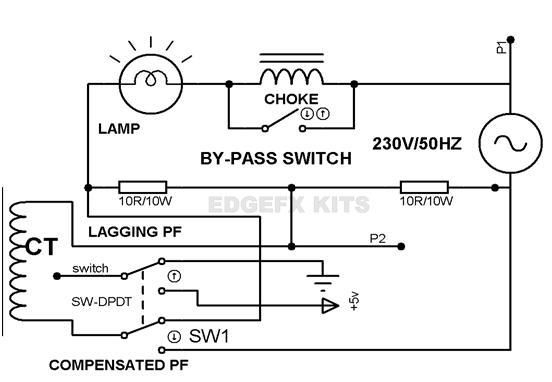
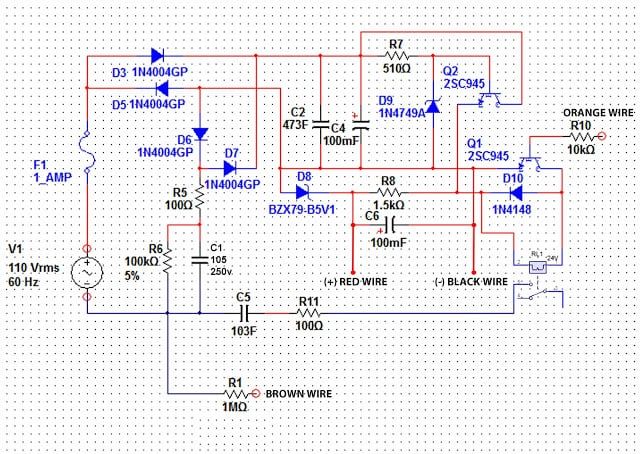
ベルとリレーの接続に関する詳細情報:

更新:A5からSCLおよびA4からSDA(A4からSCKではない)
リアルタイムクロックモジュール
ザ・ リアルタイムクロック モジュールは、長時間の停電後も時間を追跡します。ベルのオンとオフを切り替えるための9Vリレーが用意されています。
リレーからの有害な高電圧逆起電力を吸収するリレー(回路図には示されていません)の両端に逆バイアスで1N4007ダイオードを接続してください。
を使用して回路に電力を供給します 9V / 500mAウォールアダプター 。
ある状況でベルを手動で操作するための3つのプッシュボタンが1つ用意されています。 「終了」ボタンを押すと、手動でベルを鳴らした後、ベルが停止します。
「ベル無効化ボタン」は、ベルを永久に無効にします。ベルを再度有効にするには、「終了」ボタンを押します。
RTCモジュールに時間を設定する方法:
RTCライブラリをダウンロードします。
リンク:github.com/PaulStoffregen/DS1307RTC
-------------------------------------------------- ---------------
timeLib.hをダウンロードします。
github.com/PaulStoffregen/Time
-------------------------------------------------- --------------------------------
プログラムをアップロードする
時間をRTCに設定する以下のプログラムをアップロードします
//----------------------------------------------------//
 #include
 #include
 #include
 int P=A3 //Assign power pins for RTC
 int N=A2
 const char *monthName[12] = {
 'Jan', 'Feb', 'Mar', 'Apr', 'May', 'Jun',
 'Jul', 'Aug', 'Sep', 'Oct', 'Nov', 'Dec'
 }
 tmElements_t tm
 void setup() {
 pinMode(P,OUTPUT)
 pinMode(N,OUTPUT)
 digitalWrite(P,HIGH)
 digitalWrite(N,LOW)
 bool parse=false
 bool config=false
 // get the date and time the compiler was run
 if (getDate(__DATE__) && getTime(__TIME__)) {
 parse = true
 // and configure the RTC with this info
 if (RTC.write(tm)) {
 config = true
 }
 }
 Serial.begin(9600)
 while (!Serial) // wait for Arduino Serial Monitor
 delay(200)
 if (parse && config) {
 Serial.print('DS1307 configured Time=')
 Serial.print(__TIME__)
 Serial.print(', Date=')
 Serial.println(__DATE__)
 } else if (parse) {
 Serial.println('DS1307 Communication Error :-{')
 Serial.println('Please check your circuitry')
 } else {
 Serial.print('Could not parse info from the compiler, Time='')
 Serial.print(__TIME__)
 Serial.print('', Date='')
 Serial.print(__DATE__)
 Serial.println(''')
 }
 }
 void loop() {
 }
 bool getTime(const char *str)
 {
 int Hour, Min, Sec
 if (sscanf(str, '%d:%d:%d', &Hour, &Min, &Sec) != 3) return false
 tm.Hour = Hour
 tm.Minute = Min
 tm.Second = Sec
 return true
 }
 bool getDate(const char *str)
 {
 char Month[12]
 int Day, Year
 uint8_t monthIndex
 if (sscanf(str, '%s %d %d', Month, &Day, &Year) != 3) return false
 for (monthIndex = 0 monthIndex <12 monthIndex++) {
 if (strcmp(Month, monthName[monthIndex]) == 0) break
 }
 if (monthIndex >= 12) return false
 tm.Day = Day
 tm.Month = monthIndex + 1
 tm.Year = CalendarYrToTm(Year)
 return true
 }
 //----------------------------------------------------//
コードをアップロードした後、シリアルモニターを開くと、時刻が設定されたと表示されます。
上記の手順が正常に完了したら、次へ進みます。
次に、以下のコードをArduinoにアップロードします。
メインプログラムコード:
//------------Program developed by R.GIRISH------------//
#include
#include
#include
#include
#include
LiquidCrystal lcd(9, 8, 7, 6, 5, 4)
int i = 0
int H = 0
int M = 0
int S = 0
int setting_value
const int bell = 10
const int P = A3
const int N = A2
const int setting_address = 0
const int over_ride_off = 11
boolean bell_status = true
boolean Over_ride = true
//------------------- Set Bell Timings from hours 1 to 23 hrs -------------------//
//---- 1st bell ------//
 const int h1 = 0 //hours
 const int m1 = 0 //Minutes
 //---- 2nd bell ------//
 const int h2 = 0
 const int m2 = 0
 //---- 3rd bell ------//
 const int h3 = 0
 const int m3 = 0
 //---- 4th bell ------//
 const int h4 = 0
 const int m4 = 0
//---- 5th bell ------//
const int h5 = 0
const int m5 = 0
//---- 6th bell ------//
const int h6 = 0
const int m6 = 0
//---- 7th bell ------//
const int h7 = 0
const int m7 = 0
//---- 8th bell ------//
const int h8 = 0
const int m8 = 0
//---- 9th bell ------//
const int h9 = 0
const int m9 = 0
//---- 10th bell ------//
const int h10 = 0
const int m10 = 0
//---- 11th bell ------//
const int h11 = 0
const int m11 = 0
//---- 12th bell ------//
const int h12 = 0
const int m12 = 0
//---- 13th bell ------//
const int h13 = 0
const int m13 = 0
//---- 14th bell ------//
const int h14 = 0
const int m14 = 0
//---- 15th bell ------//
const int h15 = 0
const int m15 = 0
//---- 16th bell ------//
const int h16 = 0
const int m16 = 0
//--------------- bell ring lenght in seconds -------//
const int Lenght = 3 //in seconds
//-------------------------- -------------------------//
void setup()
{
lcd.begin(16, 2)
pinMode(P, OUTPUT)
pinMode(N, OUTPUT)
pinMode(bell, OUTPUT)
pinMode(over_ride_off, INPUT)
digitalWrite(P, HIGH)
digitalWrite(N, LOW)
digitalWrite(over_ride_off, HIGH)
attachInterrupt(0, over_ride, RISING)
attachInterrupt(1, bell_setting, RISING)
if (EEPROM.read(setting_address) != 1)
{
bell_setting()
}
}
void loop()
{
tmElements_t tm
lcd.clear()
if (RTC.read(tm))
{
H = tm.Hour
M = tm.Minute
S = tm.Second
lcd.setCursor(0, 0)
lcd.print('TIME:')
lcd.print(tm.Hour)
lcd.print(':')
lcd.print(tm.Minute)
lcd.print(':')
lcd.print(tm.Second)
lcd.setCursor(0, 1)
lcd.print('DATE:')
lcd.print(tm.Day)
lcd.print('/')
lcd.print(tm.Month)
lcd.print('/')
lcd.print(tmYearToCalendar(tm.Year))
} else {
if (RTC.chipPresent())
{
lcd.setCursor(0, 0)
lcd.print('RTC stopped!!!')
lcd.setCursor(0, 1)
lcd.print('Run SetTime code')
} else {
lcd.clear()
lcd.setCursor(0, 0)
lcd.print('Read error!')
lcd.setCursor(0, 1)
lcd.print('Check circuitry!')
}
}
if (EEPROM.read(setting_address) == 1)
{
if (H == 0 && M == 0 && S == 0)
{
digitalWrite(bell, LOW)
}
if (H == h1 && M == m1 && S == 0)
{
for (i = 0 i
digitalWrite(bell, HIGH)
delay(1000)
}
digitalWrite(bell, LOW)
i = 0
}
if (H == h2 && M == m2 && S == 0)
{
for (i = 0 i
digitalWrite(bell, HIGH)
delay(1000)
}
digitalWrite(bell, LOW)
i = 0
}
if (H == h3 && M == m3 && S == 0)
{
for (i = 0 i
digitalWrite(bell, HIGH)
delay(1000)
}
digitalWrite(bell, LOW)
i = 0
}
if (H == h4 && M == m4 && S == 0)
{
for (i = 0 i
digitalWrite(bell, HIGH)
delay(1000)
}
digitalWrite(bell, LOW)
i = 0
}
if (H == h5 && M == m5 && S == 0)
{
for (i = 0 i
digitalWrite(bell, HIGH)
delay(1000)
}
digitalWrite(bell, LOW)
i = 0
}
if (H == h6 && M == m6 && S == 0)
{
for (i = 0 i
digitalWrite(bell, HIGH)
delay(1000)
}
digitalWrite(bell, LOW)
i = 0
}
if (H == h7 && M == m7 && S == 0)
{
for (i = 0 i
digitalWrite(bell, HIGH)
delay(1000)
}
digitalWrite(bell, LOW)
i = 0
}
if (H == h8 && M == m8 && S == 0)
{
for (i = 0 i
digitalWrite(bell, HIGH)
delay(1000)
}
digitalWrite(bell, LOW)
i = 0
}
if (H == h9 && M == m9 && S == 0)
{
for (i = 0 i
digitalWrite(bell, HIGH)
delay(1000)
}
digitalWrite(bell, LOW)
i = 0
}
if (H == h10 && M == m10 && S == 0)
{
for (i = 0 i
digitalWrite(bell, HIGH)
delay(1000)
}
digitalWrite(bell, LOW)
i = 0
}
if (H == h11 && M == m11 && S == 0)
{
for (i = 0 i
digitalWrite(bell, HIGH)
delay(1000)
}
digitalWrite(bell, LOW)
i = 0
}
if (H == h12 && M == m12 && S == 0)
{
for (i = 0 i
digitalWrite(bell, HIGH)
delay(1000)
}
digitalWrite(bell, LOW)
i = 0
}
if (H == h13 && M == m13 && S == 0)
{
for (i = 0 i
digitalWrite(bell, HIGH)
delay(1000)
}
digitalWrite(bell, LOW)
i = 0
}
if (H == h14 && M == m14 && S == 0)
{
for (i = 0 i
digitalWrite(bell, HIGH)
delay(1000)
}
digitalWrite(bell, LOW)
i = 0
}
if (H == h15 && M == m15 && S == 0)
{
for (i = 0 i
digitalWrite(bell, HIGH)
delay(1000)
}
digitalWrite(bell, LOW)
i = 0
}
if (H == h16 && M == m16 && S == 0)
{
for (i = 0 i
digitalWrite(bell, HIGH)
delay(1000)
}
digitalWrite(bell, LOW)
i = 0
}
}
delay(1000)
}
void over_ride()
{
lcd.clear()
while (Over_ride)
{
digitalWrite(bell, HIGH)
lcd.setCursor(0, 0)
lcd.print('Press Exit to')
lcd.setCursor(0, 1)
lcd.print('Stop the bell!!!')
if (digitalRead(over_ride_off) == LOW)
{
Over_ride = false
digitalWrite(bell, LOW)
}
}
Over_ride = true
}
void bell_setting()
{
setting_value = 0
EEPROM.write(setting_address, setting_value)
lcd.clear()
while (bell_status)
{
lcd.setCursor(0, 0)
lcd.print('Bell is Disabled')
lcd.setCursor(0, 1)
lcd.print('Press Exit.')
if (digitalRead(over_ride_off) == LOW)
{
bell_status = false
}
}
bell_status = true
setting_value = 1
EEPROM.write(setting_address, setting_value)
}
//------------Program developed by R.GIRISH------------//
上記のコードをアップロードすると、ディスプレイに時間単位の時間が表示されます。
これでプログラムコードは終わりです。
この自動ベルシステムの使用方法:
完了したハードウェアセットアップでこれを行います。
1.最初に「時間設定」コードをアップロードし、シリアルモニターを開きます。
2.メインプログラムで、リレーをトリガーする必要がある時間をここで設定します。
//---- 1st bell ------//
const int h1 = 0 //hours
const int m1 = 0 //Minutes
//---- 2nd bell ------//
const int h2 = 0
const int m2 = 0
//---- 3rd bell ------//
const int h3 = 0
const int m3 = 0
//---- 4th bell ------//
const int h4 = 0
const int m4 = 0
•h1を1〜23時間の時間で設定し、m1を0〜59の分で設定します。
•h1からh16およびm1からm16についても同じです。
•ベルリーブ値h = 0およびm = 0を無効にする場合(例:h5 = 0およびm5 = 0)、ゼロはその特定のベルを無効にします。
3.ベルをオン/オフする時間の長さをここで設定します。
// ---------------ベルリングの長さ(秒)------- //
const int Lenght = 3 //秒単位
デフォルトでは、値は3秒に設定されています。設定時刻になったら リレー 3秒間オンになり、オフになります。必要に応じてこれを変更してください。
4.変更したコードをArduinoにアップロードします。
5.ベルを無効にするには、「ベル無効ボタン」を押します。再度有効にするには、「終了」ボタンを押します。
6.ベルを手動で鳴らすには、「手動ベルスイッチ」を押し、ベルを停止するには、「終了」を押します。
これでプロジェクトは終了です。このプロジェクトについて質問がある場合は、コメントセクションでお気軽にご連絡ください。
前:バッテリーなしでこのモスキートバットを作る 次へ:RFIDベースの出席システムを作成する方法